The Project
KickStart interface presents an 8-step planning process, activated by the user.
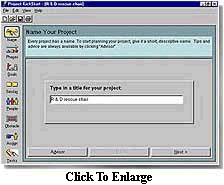
Step 1 First, you give the project a name. Each screen includes an Advisor Button
to see instructions or tips for completing the current project-planning step. This
is especially helpful for novice project planners. An example of this advice
in Step 1 is: “Avoid vague project names like "Database project" or "CDP-7", particularly if you plan to circulate reports
to others. Tip: ‘Use short but descriptive project names, like "Customer Service Automation’".
Step 2 Here, you consider how the project breaks down into natural phases or sequences in
which the project will happen. An on-screen Library of sample phases helps stimulate
your thinking, serves as a repository of company-specific terms and helps speed along the project planning process. These sample phases can be easily dragged and dropped into the project.
Once phases have
been identified you add tasks to each of the phases. This is where you really
begin to break down the work required in the project.
Step 3 The Goals step helps you to determine and list the goals of the project. You then add any tasks required to achieve these goals, or you drag and drop sample goals from the Goals
Library.
Step 4 Similar Projects -- a unique feature in Project KickStart – lets you “borrow”
tasks and ideas from “Similar Projects.” Specifically, you review previous projects for tasks that may work in
your current project. The program allows you to just drag and drop them into the new project’s relevant phases.
Step 5 The People step is where you identify the people who will serve as the resources for
the project. Considering these people, you add new tasks that these people might think of or need to do. There is an on-screen People Library which you can populate with members of your team, other stakeholder
or departments.
(The People Library also lets you Import names from your Outlook address
book. Later, you can send the project plan to Outlook where you can track the
project’s progress.)
Step 6 The Obstacles step is one of the most popular parts of the program. In this step, you focus on the risks that impede progress of the project.
You write in the obstacles, or drag and drop terms from the Obstacles Library.
Then you consider any relevant tasks to avoid or overcome these obstacles. For
example, if you were supposed to deliver product by a certain date, what would happen if no one called the shipping company
ahead of time. Task: “Check with shipping department and alert them to
your requirements in advance.”
Step 7 Assign tasks to people. This is where you get a sense of who will do what. You can
assign an individual, team, or even Department.
Step 8 The Tasks view is where you begin to really pull together the project you built. Here, you see a list of all the Phases and Tasks in the plan, along with details about
the resources at each level. Up to ten levels of sub-tasks can be added to any item.
Handy arrows at the top, right side of the screen move and reorder tasks. You can also enter notes for any phase or
task here.
Gantt chart/Scheduling. Click on the Gantt chart tab located on the top of the screen above the Task Name column, and you can enter
start and finish dates, drag the task bar to change duration and create a visual Gantt chart that provides the high level
summary of a project.
The timescale and
the groups of tasks can be shifted back and forth in time and there is a “Done” check box where you can record
progress.
Project KickStart’s
Gantt chart meets the needs of most small to mid-sized project. For larger projects,
which need more tracking and scheduling features, Project KickStart has direct links to Microsoft Project, Project Scheduler,
SureTrak, FastTrack Schedule and Milestones 2000. With one click the Project
KickStart generated plan flows into each of these programs.
The program’s
Reports editor creates a wide range of reports that can be used as “to-do” lists, work assignments, proposals,
business plans, process templates and more. You can include Project KickStart plans in any type of communication by using
the program’s direct links to Microsoft Word, Outlook and Excel.